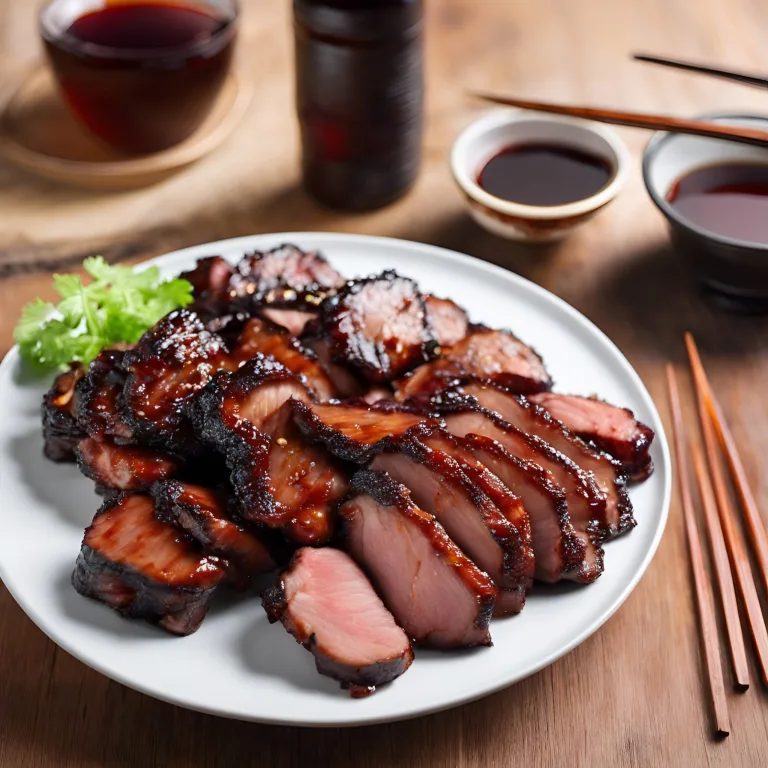
Char Siu, or Chinese BBQ Pork, is a classic Cantonese dish known for its shiny, red-glazed exterior and succulent, flavorful interior. This beloved dish involves marinating strips of pork in a sweet and savory sauce, then roasting them to perfection. The unique flavor of Char Siu comes from a combination of honey, five-spice powder, soy sauce, hoisin sauce, and sometimes red bean curd or red food coloring to achieve its signature color. Char Siu can be enjoyed on its own, served with rice or noodles, or used as a filling for baozi (steamed buns) and other dim sum dishes. Making Char Siu at home allows you to customize the flavors to your liking and creates a fun cooking project with delicious results.
Ingredients Required
Pork shoulder or loin: 2 lbs (about 900g), cut into long strips
Soy sauce: 2 tablespoons
Hoisin sauce: 2 tablespoons
Honey: 2 tablespoons
Chinese rice wine or dry sherry: 1 tablespoon
Oyster sauce: 1 tablespoon
Five-spice powder: 1 teaspoon
Garlic: 2 cloves, minced
Red food coloring or red bean curd (optional): for color
Sesame oil: 1 teaspoon
Recommended Kitchen Gear
Large mixing bowl or resealable plastic bag for marinating
Baking sheet or roasting pan
Wire rack (optional, for even cooking)
Aluminum foil (for easy cleanup)
Pastry brush (for glazing)
Meat thermometer (to ensure proper cooking)
Directions (How-to Make It)
Prepare the Marinade: In a large mixing bowl, combine soy sauce, hoisin sauce, honey, rice wine, oyster sauce, five-spice powder, minced garlic, and sesame oil. If using, add red food coloring or mashed red bean curd to achieve the desired color.
Marinate the Pork: Add the pork strips to the marinade, ensuring they are well coated. Cover and refrigerate for at least 4 hours, preferably overnight, to allow the flavors to penetrate the meat.
Preheat the Oven: Preheat your oven to 375°F (190°C). Line a baking sheet with aluminum foil and place a wire rack on top, if available.
Roast the Pork: Remove the pork from the marinade, reserving the excess marinade. Place the pork strips on the wire rack. Roast for 25-30 minutes, turning once halfway through and basting with the reserved marinade, until the pork is just cooked through and the exterior is caramelized.
Glaze and Finish: In the last few minutes of cooking, brush the pork with honey to create a glossy finish. The internal temperature of the pork should reach 145°F (63°C) when done.
Rest and Serve: Let the Char Siu rest for a few minutes before slicing. Serve warm with rice, noodles, or your favorite sides.
Homemade Char Siu is a delightful dish that brings the flavors of Cantonese barbecue into your kitchen. With its tender meat and distinctive glaze, it's sure to become a favorite for special occasions or whenever you crave something sweet and savory.
Mapo Tofu is a popular Sichuan dish known for its bold flavours—spicy, numbing, and deeply savoury. The dish combines soft tofu with ground meat (either pork or beef) in a spicy bean-based sauce, seasoned with Sichuan peppercorns to give it its signature numbing effect. Garlic, ginger, and fermented ingredients like doubanjiang (fermented broad bean and chili paste) and douchi (fermented black beans) add depth and complexity to the dish. Mapo Tofu is both a comforting home-cooked meal and a favorite in Chinese restaurants worldwide. It's typically served with steamed rice and is ideal for those who love spicy, flavorful food. Preparing Mapo Tofu requires a few specialized ingredients, but the cooking process is straightforward, making it accessible for cooks of all levels.
Ingredients Required
Soft tofu: 1 block (about 400g or 14 oz), cut into cubes
Ground pork or beef: 100g (about 3.5 oz)
Sichuan peppercorns: 1 teaspoon, ground
Doubanjiang (fermented broad bean and chili paste): 2 tablespoons
Douchi (fermented black beans): 1 tablespoon, rinsed and minced
Garlic: 3 cloves, minced
Ginger: 1 tablespoon, minced
Chicken stock: 1 cup
Soy sauce: 1 tablespoon
Sesame oil: 1 teaspoon
Cornstarch: 1 tablespoon, mixed with 2 tablespoons water (cornstarch slurry)
Green onions: 2, finely sliced for garnish
Vegetable oil: for cooking
Recommended Kitchen Gear
Wok or large frying pan
Wooden spoon or spatula
Knife and cutting board
Measuring spoons and cups
Small bowl for cornstarch slurry
Directions (How-to Make It)
Prepare the Tofu: Bring a pot of water to a boil and gently blanch the tofu cubes for about 1 minute to firm them up. Drain and set aside.
Cook the Meat: Heat vegetable oil in a wok or large frying pan over medium-high heat. Add the ground meat and cook until browned, breaking it up into small pieces.
Add Aromatics and Bean Paste: Add the minced garlic, ginger, doubanjiang, and douchi to the meat. Stir-fry until fragrant, about 1-2 minutes, making sure the paste is well mixed with the meat.
Simmer with Tofu: Pour in the chicken stock and bring to a simmer. Gently add the tofu cubes, trying not to break them. Stir gently to combine. Let the mixture simmer for about 5 minutes so the tofu absorbs the flavors.
Thicken the Sauce: Stir the cornstarch slurry and then add it to the pan, stirring gently until the sauce thickens.
Season: Add the ground Sichuan peppercorns and soy sauce. Drizzle with sesame oil and give it a final gentle stir.
Garnish and Serve: Transfer to a serving dish and sprinkle with sliced green onions. Serve hot with steamed rice.
Mapo Tofu is a testament to the rich, bold flavors of Sichuan cuisine, offering a delightful combination of textures and a complex layering of tastes. It's a must-try dish for lovers of spicy food and a great introduction to cooking with fermented ingredients.
Peking duck is a renowned dish from Beijing, China, celebrated for its crispy skin, succulent meat, and the elaborate preparation that dates back to the imperial era. This delicacy involves air-drying the duck, then roasting it until the skin becomes crisp and golden, often served with steamed pancakes, thinly sliced cucumbers, scallions, and hoisin sauce. Making Peking duck at home can be challenging but rewarding, offering a taste of China's rich culinary heritage. Ideal for special occasions or an adventurous weekend project, it requires patience and some specialized kitchen equipment.
Ingredients Required
Whole duck: 1 (about 5 to 6 pounds)
Boiling water: for scalding
Honey: 1 tablespoon
Soy sauce: 1 tablespoon
Rice vinegar: 1 tablespoon
Molasses or maltose: 2 tablespoons
Water: 1 cup (for the glaze)
Five-spice powder: 1 teaspoon
Fresh ginger: 2 slices
Green onions: 2, for stuffing
Salt: to taste
Recommended Kitchen Gear
Roasting pan with rack
Meat hook or strong string (for hanging the duck)
Basting brush
Steamer for pancakes
Sharp knife for carving
Cleaver (optional, for chopping)
Directions (How-to Make It)
Prepare the Duck: Clean the duck thoroughly and pluck any remaining feathers. Cut off the wings at the first joint and remove the giblets from the cavity. Rinse the duck inside and out, then pat dry with paper towels.
Scald the Duck: Bring a large pot of water to a boil. Hold the duck by its wings and scald the skin by ladling boiling water over it. This process helps tighten the skin.
Prepare the Glaze: In a saucepan, combine honey, soy sauce, rice vinegar, molasses (or maltose), and water. Bring to a simmer, stirring until the molasses has dissolved. Brush the duck with the glaze, then hang it to dry in a cool, airy place for 24 hours. A fan can help speed up this process.
Roast the Duck: Preheat your oven to 350°F (175°C). Stuff the duck with ginger and green onions, then season the cavity with salt and five-spice powder. Place the duck breast side up on a rack in the roasting pan and roast for about 1 hour and 15 minutes, or until the skin is richly browned and crisp. Baste occasionally with the remaining glaze.
Serve: Carve the duck and serve it with steamed pancakes, thinly sliced cucumbers, scallions, and hoisin sauce. Guests can wrap pieces of duck, cucumber, and scallion in pancakes, adding hoisin sauce to taste.
Creating Peking duck at home is a culinary adventure that brings a piece of Chinese cooking tradition into your kitchen. While it may not be a quick weeknight meal, the process is a rewarding experience that culminates in a truly spectacular dish.
Dive into the heart of Italian cuisine with Creamy Tuscan Chicken, a dish that marries the robust flavors of the Tuscan region with the comfort of creamy sauce and tender chicken. This recipe is a celebration of simple ingredients coming together to create a meal that's both hearty and elegant. Perfect for a cozy dinner at home, impressing guests, or just treating yourself to a delicious and satisfying meal, Creamy Tuscan Chicken is sure to become a favorite. With minimal prep and a handful of kitchen staples, you'll be able to whip up this restaurant-quality dish in no time, filling your kitchen with the irresistible aroma of garlic, herbs, and sun-dried tomatoes.
Equipment Required
Large skillet or frying pan
Knife and cutting board
Measuring cups and spoons
Wooden spoon or spatula for stirring
Ingredients Required
4 boneless, skinless chicken breasts
Salt and pepper to taste
2 tablespoons olive oil
3 cloves garlic, minced
1 cup heavy cream
1/2 cup chicken broth
1 teaspoon Italian seasoning
1/2 cup sun-dried tomatoes, chopped
1/2 cup grated Parmesan cheese
2 cups fresh spinach
Optional: Fresh basil for garnish
Directions (How-to Make It)
Prepare the Chicken: Season both sides of the chicken breasts with salt and pepper. In a large skillet, heat the olive oil over medium-high heat. Add the chicken breasts and cook until golden brown on both sides and cooked through, about 6-8 minutes per side. Remove the chicken from the skillet and set aside.
Make the Sauce: In the same skillet, add the minced garlic and sauté for about 1 minute until fragrant. Pour in the heavy cream, chicken broth, and Italian seasoning. Stir to combine and bring the mixture to a simmer.
Add the Sun-Dried Tomatoes and Parmesan: Stir in the sun-dried tomatoes and grated Parmesan cheese. Let the sauce simmer for a few minutes until it begins to thicken slightly.
Incorporate the Spinach: Add the fresh spinach to the skillet and cook until the spinach has wilted, about 2-3 minutes.
Return the Chicken to the Skillet: Place the cooked chicken breasts back into the skillet, spooning the sauce over them to coat. Cook for another 2-3 minutes to ensure the chicken is heated through and infused with the sauce flavors.
Serve: Transfer the chicken breasts to plates and spoon the creamy Tuscan sauce over the top. Garnish with fresh basil if desired.
Creamy Tuscan Chicken is a dish that truly showcases the power of simple, flavourful ingredients combined in the right way. The creamy sauce, enriched with the tang of sun-dried tomatoes and the earthiness of spinach, perfectly complements the juicy chicken breasts, making every bite a delight. Serve this dish over pasta, rice, or with a side of crusty bread to soak up the delicious sauce for a meal that's sure to transport you to the rolling hills of Tuscany.
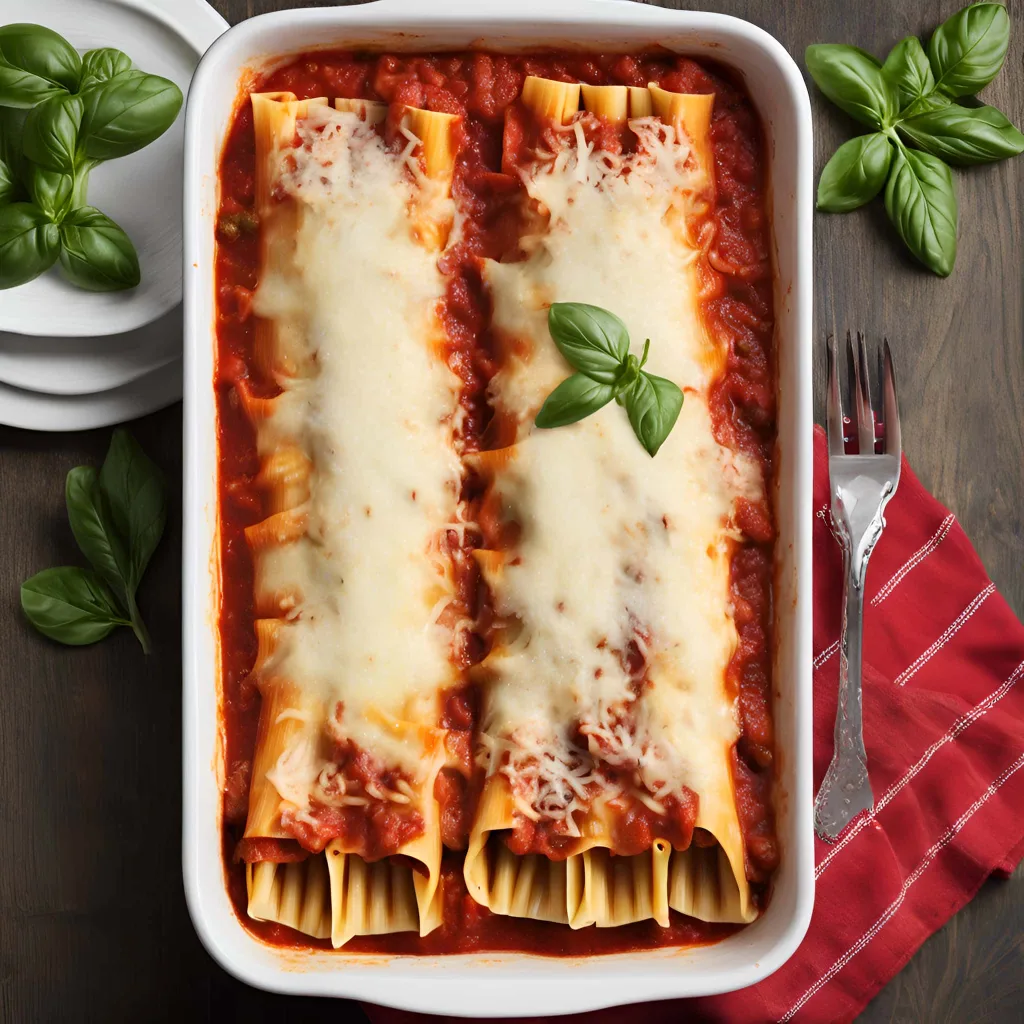
Embark on a culinary journey to Italy with this Easy Manicotti recipe, a classic dish that brings the rich, comforting flavours of Italian cuisine right to your table. Perfect for a cozy family dinner, special occasions, or whenever the craving for something cheesy and delicious strikes, this manicotti recipe is simplified for convenience without sacrificing taste. It's ideal for both novice cooks and seasoned home chefs looking for a straightforward yet satisfying meal. With its creamy filling, flavorful sauce, and melted cheese topping, this dish is sure to become a staple in your recipe collection. Plus, with basic kitchen equipment, you can prepare a meal that feels gourmet with minimal effort.
Equipment Required
Large pot for boiling manicotti shells
Mixing bowl for cheese filling
Spoon or piping bag for filling manicotti
9x13 inch baking dish
Aluminum foil (optional, for covering while baking)
Ingredients Required
1 package (8 oz) manicotti shells
15 oz ricotta cheese
2 cups shredded mozzarella cheese, divided
1/2 cup grated Parmesan cheese, plus more for topping
1 egg
2 teaspoons dried Italian seasoning
Salt and pepper to taste
2 cups marinara sauce, store-bought or homemade
Fresh basil for garnish (optional)
Directions (How-to Make It)
Preheat Oven and Prepare Manicotti Shells: Preheat your oven to 350°F (175°C). Bring a large pot of salted water to a boil. Add the manicotti shells and cook until al dente, according to package instructions. Drain and rinse under cold water to stop the cooking process; set aside.
Mix the Filling: In a mixing bowl, combine the ricotta cheese, 1 cup of the mozzarella cheese, the Parmesan cheese, egg, Italian seasoning, salt, and pepper. Stir until well mixed. If the mixture is too thick, you can add a little milk to thin it out for easier piping.
Fill the Manicotti: Spoon the cheese mixture into a piping bag or a plastic bag with a corner cut off. Gently fill each manicotti shell with the cheese mixture, being careful not to tear the shells.
Assemble the Dish: Spread a thin layer of marinara sauce on the bottom of a 9x13 inch baking dish. Arrange the filled manicotti in a single layer over the sauce. Pour the remaining marinara sauce over the top of the manicotti, covering them completely. Sprinkle the remaining mozzarella cheese and a little extra Parmesan over the sauce.
Bake: Cover the dish with aluminum foil (to prevent cheese from burning) and bake in the preheated oven for 25 minutes. Remove the foil and bake for an additional 10-15 minutes, or until the cheese is bubbly and slightly golden.
Serve: Let the manicotti cool for a few minutes before serving. Garnish with fresh basil leaves if desired.
This Easy Manicotti recipe captures the essence of Italian comfort food with every bite. The creamy, cheesy filling wrapped in tender pasta shells, all smothered in a savory marinara sauce and baked to perfection, creates a dish that's as heartwarming as it is delicious. Serve it up for any occasion and watch as it becomes an instant favorite among family and friends. Buon appetito!
Dive into the unique, bold flavors of our Radicchio Salad recipe, a vibrant dish that combines the slightly bitter, peppery taste of radicchio with a variety of textures and complementary flavors. This salad is a celebration of simplicity and sophistication, offering a refreshing departure from the ordinary green salad. Perfect for those who love to explore different taste profiles or for anyone looking to add a splash of color and a burst of flavor to their meal. Whether served as an elegant starter, a light lunch, or a colorful side, Radicchio Salad is as versatile as it is delicious. With just a few kitchen essentials and some fresh ingredients, you can create a salad that's sure to impress.
Equipment Required
Knife and cutting board
Salad spinner or paper towels (for drying leaves)
Large mixing bowl
Small bowl for dressing
Whisk or fork for emulsifying dressing
Ingredients Required
1 head of radicchio, leaves separated, washed, and torn into bite-sized pieces
1/4 cup walnuts, toasted and roughly chopped
1/2 cup pear, thinly sliced
1/4 cup Parmesan cheese, shaved
2 tablespoons balsamic vinegar
1/4 cup extra virgin olive oil
1 teaspoon honey or maple syrup
Salt and pepper to taste
Optional: 1/4 cup dried cranberries or cherries for added sweetness
Directions (How-to Make It)
Prepare the Radicchio: After washing the radicchio leaves, dry them thoroughly using a salad spinner or pat them dry with paper towels. Tear the leaves into bite-sized pieces and place them in a large mixing bowl.
Toast the Walnuts: In a dry skillet over medium heat, toast the walnuts until they're fragrant and lightly browned, about 3-5 minutes. Keep an eye on them to prevent burning. Let them cool, then roughly chop.
Make the Dressing: In a small bowl, whisk together the balsamic vinegar, extra virgin olive oil, and honey (or maple syrup) until well combined. Season with salt and pepper to taste.
Assemble the Salad: Add the sliced pear and toasted walnuts to the radicchio in the large mixing bowl. If using, sprinkle the dried cranberries or cherries over the top. Drizzle the dressing over the salad and gently toss to ensure all the ingredients are evenly coated.
Serve: Garnish the salad with shaved Parmesan cheese. Serve immediately to enjoy the crispness of the radicchio and the blend of flavors.
Radicchio Salad offers a wonderful contrast in flavors and textures, from the bitter crunch of radicchio to the sweet, juicy pears, the nutty walnuts, and the creamy Parmesan. It's a testament to the beauty of simplicity in cooking, showcasing how a handful of ingredients can come together to create a dish that's both elegant and deeply satisfying. Whether you're looking to elevate a weeknight dinner or impress guests at a dinner party, this salad is a surefire way to delight the palate.
Who doesn't love a good Mac'n'Cheese? This timeless comfort food is a favorite for many and for good reason. It's creamy, cheesy, and utterly delicious. Plus, it's incredibly easy to make, making it perfect for a quick weeknight dinner when time is of the essence or a cozy Sunday meal to enjoy with family. Whether you're a cooking novice or a seasoned chef, this Mac'n'Cheese recipe is bound to become a staple in your kitchen. So, let's dive into the world of gooey cheese and tender pasta with a recipe that's as fun to make as it is to eat!
Ingredients for Mac'n'Cheese
8 ounces of elbow macaroni (about 2 cups)
2 tablespoons of unsalted butter
2 tablespoons of all-purpose flour
2 cups of whole milk
8 ounces of sharp cheddar cheese, grated (about 2 cups)
1/2 teaspoon of salt
1/4 teaspoon of ground black pepper
Optional toppings: breadcrumbs, extra cheese, paprika, or bacon bits
How to Make Mac'n'Cheese Step-by-Step
Cook the Pasta: Bring a large pot of salted water to a boil. Add the elbow macaroni and cook according to the package instructions until al dente. Drain the pasta and set it aside.
Make the Roux: In the same pot, melt the butter over medium heat. Sprinkle the flour over the melted butter and whisk continuously for about 1 minute to cook off the floury taste. This mixture is called a roux and will help thicken your cheese sauce.
Add the Milk: Gradually add the milk to the roux, whisking constantly to prevent any lumps from forming. Continue to cook and whisk until the mixture thickens and begins to simmer, about 5 minutes.
Add the Cheese: Lower the heat to medium-low and add the grated cheddar cheese to the pot. Stir until the cheese is completely melted and the sauce is smooth. Season with salt and pepper to taste.
Combine Pasta and Cheese Sauce: Add the drained macaroni to the cheese sauce and stir until the pasta is evenly coated. If the sauce seems too thick, you can thin it out with a little more milk, added a tablespoon at a time.
Optional Toppings: If you're feeling adventurous, sprinkle your Mac'n'Cheese with breadcrumbs, extra cheese, paprika, or bacon bits for added flavor and texture. Place under the broiler for a few minutes until the topping is golden and crispy.
Serve: Serve the Mac'n'Cheese immediately, straight from the pot, or transfer it to a serving dish. Enjoy the creamy, cheesy goodness!
This Mac'n'Cheese recipe is not only a crowd-pleaser but also a testament to the beauty of simple, comforting meals. Whether it's a hectic weekday or a leisurely weekend, this dish is sure to satisfy your cravings for something cheesy and delicious. Happy cooking!
Pizza Prosciutto e Funghi combines the delicate, savory flavors of prosciutto with the earthy depth of mushrooms, creating a harmonious blend atop a classic pizza base. This Italian staple is a testament to the elegance of simplicity, where each ingredient is allowed to shine, contributing to a sophisticated yet comforting dish. Here at Yumoid.com the Prosciutto e Funghi pizza is among our favourites, and its far easier to make than many would believe!
Mushrooms: 1 cup, thinly sliced (button or cremini work well)
Olive oil: For drizzling
Salt and freshly ground black pepper: to taste
Fresh basil leaves: A handful for garnish (optional)
What you need
Pizza stone or baking sheet
Rolling pin (if hand-stretching the dough)
Pizza cutter or knife
Oven
Baking parchment (optional, for easier transfer)
Directions (How-to Make It)
Preheat the Oven: Place a pizza stone in the oven and preheat to the highest temperature, typically between 475°F (245°C) to 500°F (260°C), for at least 30 minutes. If using a baking sheet, no need to preheat it.
Prepare the Dough: On a lightly floured surface, roll out or hand-stretch the pizza dough to your desired thickness, aiming for a 12 to 14-inch circle.
Assemble the Pizza: Spread the tomato sauce evenly over the dough, leaving a small border around the edges. Evenly distribute the mozzarella cheese over the sauce, then arrange the sliced mushrooms on top. Season with a little salt and freshly ground black pepper.
Bake the Pizza: Transfer the pizza to the preheated pizza stone or baking sheet. Bake for about 10-15 minutes, or until the crust is golden and the cheese is bubbly.
Add the Prosciutto: Once the pizza is baked, remove it from the oven and immediately top with the prosciutto slices. The residual heat will gently warm the prosciutto without cooking it, preserving its delicate flavor and texture.
Garnish and Serve: Drizzle with a little olive oil and scatter fresh basil leaves over the top, if using. Slice and serve immediately.
Pizza Prosciutto e Funghi is a delightful combination of flavors that elevates the pizza experience. It's a dish that pairs well with a light salad and a glass of Italian wine, making for a truly enjoyable meal. Enjoy the process of making it and the pleasure of sharing it with those you love.
Pizza Diavola, or "Devil's Pizza," is a spicy and flavorful pizza recipe that has earned its place in the hearts of those who love a little heat with their meal. This Italian classic combines the simplicity of a Margherita pizza with the fiery kick of spicy salami, usually in the form of pepperoni or 'nduja, a particularly spicy, spreadable pork salumi from Italy.
The name "Diavola" reflects its devilishly hot flavour profile, making it a favourite among those who appreciate a bit of spice in their food. Ideal for a casual dinner, game night, or any occasion that calls for a dish with a bit of a kick, Pizza Diavola is as fun to make as it is to eat.
Preheat the Oven: If you're using a pizza stone, place it in the oven and preheat to the highest temperature, typically between 475°F (245°C) to 500°F (260°C), for at least 30 minutes. If using a baking sheet, no need to preheat it.
Prepare the Dough: On a lightly floured surface, roll out or hand-stretch the pizza dough to your desired thickness, aiming for a 12 to 14-inch circle.
Add Toppings: Spread the tomato sauce evenly over the dough, leaving a small border around the edges. Distribute the mozzarella cheese and then add the spicy salami slices. Sprinkle with red chili flakes and a pinch of salt.
Bake the Pizza: Transfer the pizza to the preheated pizza stone or baking sheet. Bake for about 10-15 minutes, or until the crust is golden and the cheese is bubbly and starting to brown.
Garnish and Serve: Remove the pizza from the oven, let it cool for a few minutes, then drizzle with a little olive oil and scatter fresh basil leaves over the top. Slice and serve immediately.
Pizza Diavola combines the best of Italian flavors with the excitement of spice, making it a perfect dish for those looking to add a little heat to their pizza night. Enjoy crafting this spicy delight and share the warmth with friends and family!
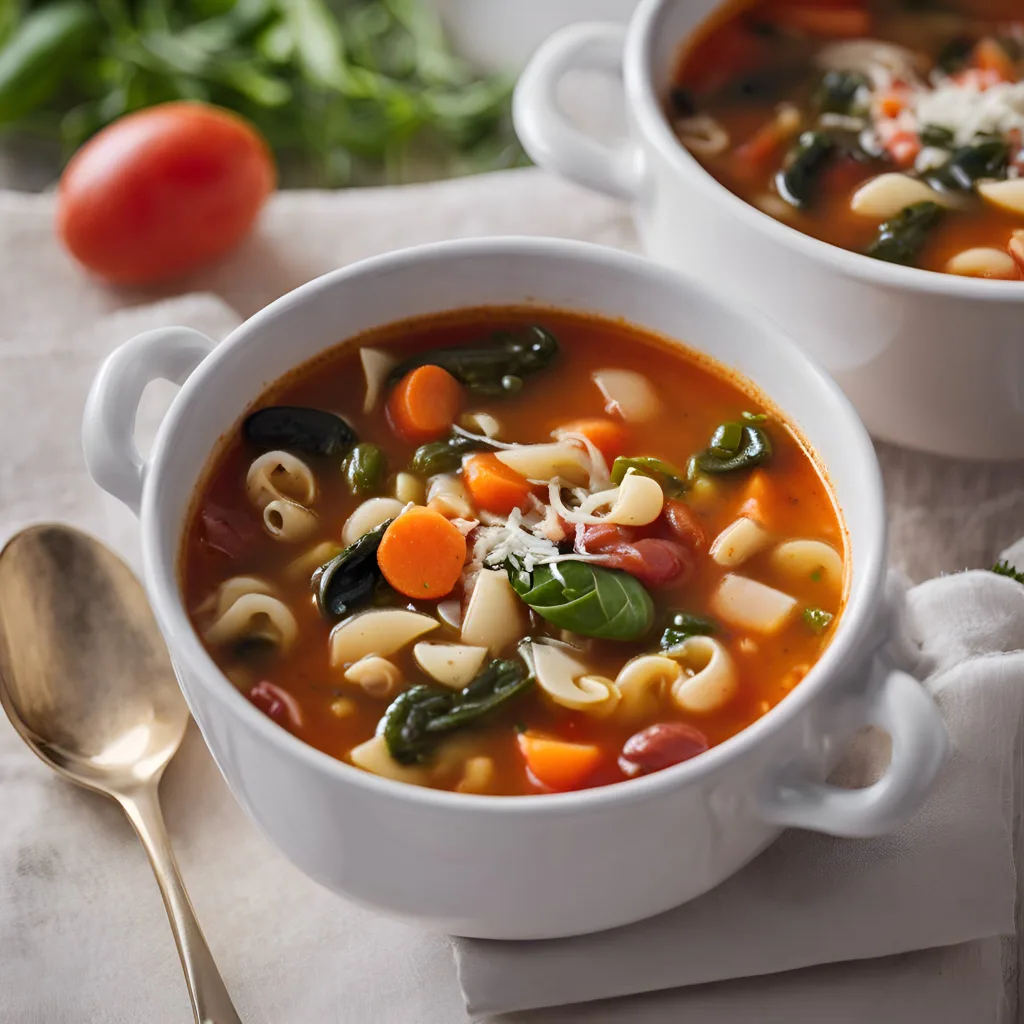
Minestrone is a hearty, nourishing Italian soup that embodies the essence of rustic, comfort food. Originating from Italy, this soup varies from region to region, featuring a rich blend of vegetables, beans, and pasta or rice, simmered in a flavorful tomato-based broth. Minestrone is a versatile dish that encourages improvisation, allowing cooks to use whatever vegetables are in season or on hand. It's a perfect way to make a warm, filling meal out of simple ingredients. Traditionally served with a sprinkle of Parmesan cheese on top, this soup is both a satisfying main course and an excellent starter. Making minestrone is straightforward, requiring basic kitchen tools and a bit of chopping.
Ingredients Required
Olive oil: 2 tablespoons
Onion: 1, chopped
Carrots: 2, diced
Celery stalks: 2, diced
Garlic cloves: 2, minced
Zucchini: 1, diced
Green beans: 1 cup, cut into 1-inch pieces
Canned tomatoes: 14 oz, diced
Vegetable or chicken broth: 6 cups
Canned kidney beans: 15 oz, drained and rinsed
Canned cannellini beans: 15 oz, drained and rinsed
Small pasta (e.g., ditalini or elbow macaroni): 1 cup
Spinach or Swiss chard: 2 cups, roughly chopped
Salt and pepper: to taste
Parmesan cheese: grated, for serving
Recommended Kitchen Gear
Large pot or Dutch oven
Knife and cutting board
Measuring cups and spoons
Wooden spoon
Ladle (for serving)
Directions (How-to Make It)
Sauté the Base Vegetables: In a large pot, heat the olive oil over medium heat. Add the onion, carrots, and celery, cooking until the vegetables start to soften, about 5 minutes. Add the minced garlic and cook for another minute until fragrant.
Add Remaining Vegetables: Stir in the zucchini and green beans, cooking for a few more minutes. Then add the diced tomatoes with their juice.
Simmer the Soup: Pour in the broth and bring the mixture to a boil. Reduce the heat to low and let simmer for about 20 minutes, or until the vegetables are tender.
Add Beans and Pasta: Add the kidney beans, cannellini beans, and pasta to the pot. Continue to simmer until the pasta is cooked, about 10 minutes. If the soup is too thick, add more broth or water to reach your desired consistency.
Finish with Greens: A few minutes before the soup is done, stir in the spinach or Swiss chard, allowing it to wilt but retain its color.
Season and Serve: Taste the soup and adjust the seasoning with salt and pepper. Serve hot, garnished with grated Parmesan cheese.
Minestrone is a celebration of seasonal vegetables and Italian culinary simplicity. It's a flexible recipe that can be adapted to whatever you have in your pantry or fridge, making it an ideal choice for a nutritious and comforting meal any day of the week.